Showing posts with label Manicure. Show all posts

Tuesday, April 14, 2015

Spring Stripes Mani

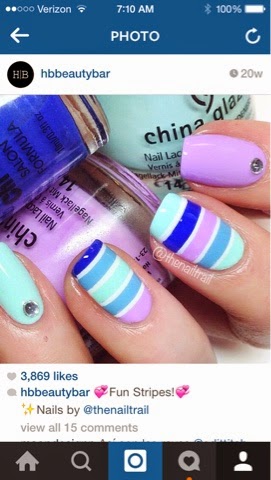
This week, the weather has been beautiful. It has really put me into full-blown spring fever mode! I wanted to do something light and fun for my manicure this week, so I turned to Instagram for inspiration and decided to recreate a manicure I've had in my favorites for months. 

The original, below, is by @thenailttrail on Instagram. 

Photo from @hbbeautybar, nails by @thenailtrail

I loved the look, so I recreated it without the studs. 


The look is super cute and simple to do. I think in the summer it would look really awesome with warmer colors! 

What are you doing to get ready for spring? Comment below! 


Saturday, March 14, 2015

First Attempt: Ruffian Manicure

Oops! So since St. Patrick's day is in the middle of the week, I completely forgot this was St. Pat's weekend, and thusly didn't do a themed manicure. But that's okay, right? There's always next year. 

What I did instead was try a manicure style that has been around for at least a year, but that I've been too afraid to try until now. It's called "The Ruffian", and it was created by Creative Nail Design for fashion designer label Ruffian's fashion show. The style intimidated me, but now that I've done it, I don't understand why! It was super easy, and I didn't even use stencils. All freehand here :) 


I was inspired by polishedbynata's neutral and neon mani that she posted on her Instagram and decided to try it with different colors. This is an easy manicure that looks great and can yield lots of fun color combinations!

Tuesday, March 4, 2014

No Sleep Til Brooklyn and My First Ever Cirque Colors

My friends Katie and Jico live up in NYC. This is pretty fantastic for me, because it means I have a great excuse to spend the weekend in the city basically whenever I want, and I LOVE the city.

Katie's birthday is this month, so Jico spent the past 3 weeks coordinating a surprise trip from me, Mike, and our friends for her. It was a big success, and we had a blast the entire weekend being rowdy and reckless (and then very tired over Sunday brunch). 

I first heard about Cirque Colors over a year ago. It is an indie line of nail polish hand made by a woman in New York; specifically, Brooklyn. Sure, you can buy her colors online, but to me, I always thought it would be more exciting to pick up a bottle while I was visiting the very place where it was made. 

Luckily, I remembered this, and emailed their customer service to find out where I could buy some. After a walk around Smorgasburg and Brooklyn Flea (both of which I highly recommend; where else can you get a Ramen Burger and an antique typewriter in the same place?), I paid a visit to a store called The Brooklyn Fox. 

The place seemed pretty high end. I walked straight to the back and picked through the Cirque Colors display. I found a sample of "XX", the first color I had my eye on from this brand. Unfortunately, there was no packaged one for sale. I tried to get the saleswomen to let me buy the sample, but they wouldn't do it, and then explained that it was "the brand's most popular color" 

 photo image_zps0a00e6fd.jpg
Fucking duh. 

Girl, please. I know. That's why I'm willing to buy the sample. 

Anyway, I ended up walking out with "Cypress" instead, which is a beautiful rose gold color with spectacular linear holo. 

 photo image_zps7bc13426.jpg
My reaction when the light hit the holo

As soon as I got back to Jersey I made time ASAP to do a new manicure using this color. I didn't do anything fancy. I didn't want to take away from the gorgeous color by making it too busy with stamping or incorporating another color. 


"Cypress" by Cirque Colors


Check out that prism


In certain lights, it just appears to be a pretty, champagne-y neutral, like so:


But then you throw some pin lighting on it (or shine your iPhone flashlight on it or, or some shit) and you get Edward Cullen on the beach in the middle of a sunny July day... Only on your nails. 


KaPOW!


DRUUUUNK IN LOOOOOOVEEEE

This was my first Cirque Colors polish, but it definitely won't be my last. I still want "XX" and after doing some IG research, I NEED "Coronation". All in all, a really successful weekend. 


Friday, February 14, 2014

Kisses and Candy Mani and Nail Vinyls Review!

Happy Valentine's Day! Normally, I like to write new blog posts on Monday, but by then nobody will care about my themed nails. So I figured I would post a little earlier this week. 


Zoya lovin'


I'm a big 'ol romantic softie. I love V-Day, and to be honest, I don't understand why some people get so butthurt and defensive about it. It's gotten to the point where people who are celebrating valentine's day borderline have to apologize for it. Hey, listen: If you don't want couples to use a commercial Hallmark holiday to showcase their love for each other, why do YOU use it to go out of your way to shit all over the holiday? Although, I am in no way encouraging you to be a cynical grinch all the time. 


The bottom line is, whether you have a significant other or not, Valentine's Day is a great day to take the time in our busy SnapChat, Insta, Need-It-Now life to tell someone you care about that you appreciate them. Have a best friend? Go grab dinner together. Get your mom a bouquet of flowers. Go catch a game with your dad. Take your dog for a walk to get some heart shaped donuts. Volunteer your time at a retirement home. Literally do anything but sit online and be a big love grouch. 


Anyway, like I said, I love Valentine's Day. So I took the time to do a themed manicure using Nail Vinyls. Linda, the inventor of Nail Vinyls, made these ingenious little guys to make nail art a hell of a lot easier for just about anyone. So what are Nail Vinyls? They are sheets of vinyl cut into different shapes (chevrons, half moons, zebra pattern, French tips, etc) that you place on your nail, paint over, and then remove to create the desired effect. This is basically like a way better and easier version of a tape manicure. The vinyls are re-stickable, and leave no residue on the nail, unlike regular tape. Here's how they work:


Step 1: Paint a base color on your nails. Let it dry completely. 

Step 2: Apply Nail Vinyls, making sure that all edges and spaces around your cuticles are sealed (lifted edges = polish bleeding!)

Step 3: Paint over the stencil

Step 4: Carefully remove vinyls while polish is still wet. Clean up. Top coat. You're done!

I did some hand painted candy hearts on my ring finger just for fun. I love the way the whole thing turned out. Also, the heart midi rings I got at Forever 21 are so cute!


This past week I also painted my friend Jess's nails. I thought this fun Scrabble themed mani would also be appropriate to post this week...


I practiced those letters so hard. 

So that's it! I hope that no matter what, you had a lovely Valentine's Day. And make sure to check out that Nail Vinyls link I posted above! At $5 and up a sheet, it's a total steal to get artsy nails the easy way. Her IG is @teismom too, and she always posts new designs and sales! 

Monday, January 13, 2014

Hand-Painted Dahlia Nails

I couldn't think of a clever post title this week 😖 sorry!

So yesterday my husband's friend Bob invited us over to his house to watch the Flyers game, but I had already been planning on watching the Golden Globes so I didn't want to go... Until Bob offered up his second TV in his man cave :P I spent a peaceful evening tainting his mancave with my femininity by sipping on wine, watching the awards show, and painting my nails. Ha! 

The weather in NJ has been pretty erratic lately. One day we are deep into a "polar vortex" (ie normal winter weather) and the next it's 55 degrees and sunny. I guess I've had spring on the mind lately, with its more consistent beautiful weather, because this week's manicure is very bright and spring-y!

Dahlias are my favorite ever flowers. I love the shape of the petals and the variety of the colors they come in. So I found a fun dahlia-type pattern and (tried to) replicate it. 

Here was the inspiration 
(Via google image)

After attempting this design on my left ring finger, I decided I didn't have the patience to do it again on my right hand. Often, my left hand has more going on design wise for two reasons: it is the hand most often featured in my nail photos, and I am right handed, so I can paint more intricate designs on my left hand. 

Instead of doing this dahlia design on my other ring finger, I did a hand painted brush stroke flower design instead and I love the way it turned out. I even did the design on my thumb nails. I think I actually prefer my right hand this week! What do you guys think? 


And here's some shots of my right hand...


Colors used for this manicure: OPI "My Vampire is Buff", Ulta "Eye-Popping Poppy", Hayley Williams for MAC in "Riot Gear", and Zoya in "Darcy". 


Monday, January 6, 2014

All I Wanna Get is a Little Bit Closer...

Hey everybody! So today my final two Amazon orders from Christmas came in the mail, so I obviously had to try them both out right away. The first was a macro lens for my iPhone. The second was a pack of four nail stud wheels from Wistonia. 

First, let me go into some depth about this macro lens. I did a lot of research on lenses before I decided on this one, called the Easy-Macro. 

The premise is pretty simple, and actually kind of brilliant. Take a mini magnifying glass, slap it on a rubber band, and vóila! Instant macro lens. There are a few benefits to this rubber band style lens... 

One is that it can stretch to fit any model and size of cell phone or camera, with or without a case, so you don't have to pop your case on and off every time you want to snap a super detailed photo.

Another benefit is that the card it comes on also doubles as storage for the lens. Just stretch it back around the card and pop it in your pocket, wallet, wherever. Convenient, right? 

Lastly, this little gem only cost me $15. 

There are a ton of macro lenses for iPhones/Androids on the market ranging anywhere from $3 to $70 or more, but this had fantastic reviews, and the price was right. So far, it works great for what I'm using it for. 

Right about now you may be wondering why anyone would want/need a macro lens to begin with. The simple answer is this: incredible detail. Exhibit A:

I know, right? 

Here's a few other photos I snapped today while testing it out:

My new betta fish, Luna

My engagement ring

A close up of Zoya's "Dream" from last week's manicure


The downside is also the incredible detail.  It means that any jagged cuticle, any missed spot of clean up, any little ding in the lacquer, is now in the spotlight 👀 I guess that just means I have to get better at what I do! 

Now for the part you likely came here for: this week's manicure.

 As I previously stated, I got a ton of nail studs in the mail today so I figured I would play around with them. I also realized that crazy hand painted nail designs are not everybody's bag, so this simplistic mani is for you traditionalists out there who enjoy cleaner desins (and, let's be honest, I didn't want my hand-painting scrutinized under that macro lens yet!).

 For this manicure, I used China Glaze's "For Audrey" topped with "Fairy Dust" by the same brand. I then took those pretty little silver almond studs and placed them at the base of the nail. A little top coat, a little clean up, and BOOM! Super chic design that still has tons of sparkle and flair to it. 


What do you folks prefer? Simple, clean manicures, or crazy detailed works of art?

Don't forget to follow me on Instagram (astoldbyadri) and Twitter (@astoldbyadri)!