Showing posts with label nail art. Show all posts

Tuesday, May 19, 2015

Mani in Manhattan: Neon Tribal

This past weekend I went with Mike to New York City to visit friends in both Manhattan and Brooklyn. We always love seeing our friends up there, and, to be honest, it's the only type of vacation we can afford right now, so we try to take advantage about twice a year or so.  

I cannot emphasize this enough: seeing the city with people who live there is a COMPLETELY different experience than seeing it by yourself. Many people who visit the city go to the typical tourist attractions: Times Square, Empire State Building, Statue of Liberty, etc. 

There's nothing wrong with those places, and they are cool to see. But when you get shown around New York by a New Yorker, you get to see all the cool little hole-in-the-wall hot spots and restaurants that you wouldn't otherwise know about. 

Brooklyn Bowl is a great example of this. It is a bowling alley in Williamsburg, Brooklyn, that doubles as a bar and concert venue. Pretty cool, right? Well they also do events, like Emo Night, which we attended Friday night. I got to dress up as a douche-y, 2005 teenager (let's be real, a former version of myself) and scream along to classic songs by Taking Back Sunday, Story of the Year, My Chemical Romance, and more. 

"Am I doing this right?"

Mike and I *did* do one tourist-y thing, and visited the Central Park Zoo. It was worth every cent, especially for the time I spent watching the harbor seals twirl around in their pool. 

There was also brunch. Lots of brunch. SO MUCH BRUNCH. I'm pretty sure by Sunday afternoon, my kidneys were swimming in champagne and orange juice. 

"Do you guys have pitchers of mimosas? Yeah, we will have one of those. That's right, just for the two of us. Thanks."

#NoShame. 

And, of course, I had to browse around a city Sephora. I'm glad I did, because I got to see, and hold in my hand, a Christian Louboutin nail polish in all it's glory. They retail for $50 EACH, so I really felt like I was in the presence of greatness. 


Which brings me to my final point: what I did with my nails for the weekend. I arrived in the city wearing a light sundress and wore a lot of black and white or tribal throughout the weekend, so I wanted to do something that would work with whatever I wore. 

Zoya in "Ali", "Purity", and "Willa"

Despite using my smallest detailing brush, the tribal still turned out a little messy, but not too terrible for my first freehand tribal. But, holy moly, that pink?! EYE searing. It's a great pink neon for the summer, it really packs a punch. 


Monday, August 4, 2014

Water Marbling: A Tutorial + New Nail Shape

Today I am going to be giving a tutorial on something that has taken me two years to figure out. The technique is called "water marbling", and it's a giant pain in the ass. It involves swirling together polishes in a cup of water before dipping your finger into the pattern to transfer the design onto your nail. 

Why put so much effort into something that will last maybe a week? Because the effect is truly beautiful, if executed successfully. 

I have read lots of water marble tutorials. I have also attempted this type of nail art several times. Just this past month, I have had 3 very successful water marbling sessions. This has lead me to believe I am now qualified to give my tips and tricks to others in need, from those of you who have never quite been able to get water marbling down, to those of you who are looking to shake up your nail designs. 

In the spirit of switching things up, I decided to try out a new nail shape. I've seen the almond shape on a lot of ladies lately, and it is something I have been thinking about trying. What was holding me back was the fact my nails aren't ever really very long, and I figured going almond would make them look stubby and stupid. However, I love the short almond look, and it turns out it has been very beneficial so far in terms of nail growth! Usually when my square shaped nails broke, it was one of the corners I lost. Without corners, I don't have this problem anymore. 

Without further ado, here is the water marbling tutorial! The finished product will look like this: 


You will need:
1 plastic cup 
Water (filtered, room temperature; more on this later)
At least 2, but no more than 4, colors of nail polish
White nail polish 
Several toothpicks or orange sticks
Nail polish remover
Tape (optional)

Step 1: Prepare Your Water

I cannot stress this enough: the condition of your water is the key to water marbling success. If your water is unfiltered/un-distilled, it won't work. If your water is too hot or too cold, it won't work. 

For best results, take a plastic cup and fill it with filtered or bottled water (I learned from first hand experience, never use a styrofoam cup. The nail polish will eat through it). 

If neither of these are available, use tap water and let it sit out for a day. Either way, you will need to let your water sit until it reaches room temperature (I told you, this is a high maintenance manicure). If you are the impatient type, it's a good idea to set up your water a day or two before you actually plan on painting your nails. 

I took this photo the day before my actual water marble. This water didn't work out. But you get the idea. 

Step 2: Paint Your Base Coat

Get your nails all prepped like you would any manicure. Then paint a white base coat on all the nails you'll be water marbling. Water marbling causes polish to spread out thin and lose opacity, so the white base will help make those colors pop. 

OPTIONAL: use scotch tape on the skin around your nail. This isn't necessary, and it's a bit time consuming, but it does make clean up a bit easier, as the excess polish will cling to the tape and not to your skin. I didn't do this in this pictorial. 

Step 3: Start Dropping the <s>Bass</s> Polish

Open up all your polishes so that they are ready to go. Pick your first color, and let a drop of polish fall on the surface of the water. If your water is in good condition, it should spread out, like so:


Continue by dropping the next color in the center of the first, and so on and so fourth until you have this bullseye effect going:


The above photo is a primo water marble set up. If your polish looks like this, you're in good shape. 

Step 4: Make Your Design

There are lots of water marble designs you can make, but I like to do a traditional zig-zag, which also happens to be the easiest. To do this, take your toothpick or orange stick and make a line from the center of your bullseye to the third or fourth ring from the outside. You don't want to drag the line to the outermost ring; this ring of polish is likely already dry, forming a sort of skin on the top of the water. Disturbing it may cause your entire design to collapse. More on this later. 


Draw another line from the center downward, like so: 

 
Finally, draw individual horizontal lines, alternating going from left to right, then right to left, so that the surface of your polish looks like this:

Trippy

Step 4 is the second trickiest part. There's a lot that can go wrong in the polish dropping phase. If everything was smooth sailing for you though, proceed. 

Step 5: When I Dip, You Dip, We Dip

Now it is time to dunk your nail. Experts can dunk 2 or more nails at the same time into a single design, but if you are a beginner I recommend doing this one at a time. 

Take your finger and place it at about a 45 degree angle to the water, nail side down (obvi) over the part of the design you like best. The angle will prevent bubbles from forming and give you a clean angle of entry into the water. 

Dip your finger in, keeping it at an angle, and hold it underneath the water. At this time, using your other hand, take another orange stick or toothpick and dip it in the water. Gently swirl the orange stick in little circles through the polish being careful not to hit the nail you have submerged. What *should* happen, is that the excess polish on the surface of the water should cling to the orange stick, allowing you to "clean" the surface of the water before you pull your nail out of it. 

Unfortunately, it's really hard to take pictures and clean the surface of your water with only one hand, so I was not able to capture this part on camera. 

Step 6: Pulling Out

Once the surface of your water is free of polish, remove your finger from the water, keeping it at an angle to avoid bubbles. If all went well, your nail should look something like this:


Step 7: Clean Up Time

With your favorite polish remover, clean up your hippy skin. I find it easiest to use a cotton ball or q-tips around the knuckles first, and then use a cuticle/angled brush to clean up real nice and close to your cuticles. 


Step 8: If Ya Liked It, You Shoulda Put a Top Coat On It

Finish it with a coat of quick-drying top coat and let it dry, and you're set!

Featuring Cirque's "Electric Circus" on accent nails. 


You can see a bit of the white polish by my cuticles. This was from some of the water marble design "folding" over a bit either when I dunked or removed my finger from the water. It happens, and will hopefully happen less often with time. 

Did your water marble not turn out as good? Are you cursing me and getting ready to chuck your phone in frustration? Wait! Hold that toss. Here's some tips that may help you next time...

TROUBLESHOOTING:

1. My polish didn't spread: Is your water in perfect condition? I'm serious, this is the most important step to water marbling success! If you're sure your water has been filtered/distilled and is room temperature, try using polishes all from the same brand. Different ingredients in different brands may cause them to not play nice together in water marbling. Once you get it down, you can experiment with mixing brands. 

Also, creme polishes are easiest to use. I don't recommend water marbling with metallic or glitter polishes off the bat. The consecutive polishes then have to push through not only the surface of the water, but the particles of glitter, which may halt spreading. 

2. My polish was picked up by my orange stick when I tried to make a design: Your water was likely too cold, or you worked too slow. You also may have dragged your orange stick too far to the edge of the bullseye. 

3. When I pulled out, my "water marble" looked like a warped mushy mess: It happens. I don't know why, but I think it has to do with removing your finger from the water. Clean your nail up and try again, practice makes perfect. 

4. My water marble has bubbles in it: Keep that nail at a 45 degree angle upon entry and pull-out! This prevents bubbles from forming. But a good top coat will also help smooth some of that out. 

5. My water marble smeared: You top coated it too soon. Wait about 5 minutes before top coating. 

Water marbling is an awesome technique to play with once you finally master it. Hopefully these tips will help you on your way to better water marbles! Sometimes, you need to read a bunch of tutorials before something "clicks" for you, but the best way to learn is to practice, practice, practice, and try not to get discouraged. 

Any more questions? Comment below! 


Tuesday, March 11, 2014

New Job and Spring Inspiration

As some of you may know, I recently got employed at Pier 1 Imports. I'm really excited about it! It is my first job in sales, but so far I am really loving it. The company seems awesome, and they really support their employees. Anybody who isn't Assosciate or Assistant Manager works part time hours, however, I can still apply for benefits and after 6 months I can pay into a 401(k), which the company matches! 

So far the hardest part has been trying not to spend all my earned money on items in the store. I already found an awesome shag rug that would match our love seat way better than the black one we currently have, and I've already set aside my first Christmas gift for someone. 

The other benefit of working at Pier 1 is that there are colors and patterns galore to be inspired by for nail art use. Our current ad is focusing on rolling out spring colors, and when you walk in, the main focus is grey and yellow 

Our scent of the month is Honeysuckle, at 20% off! (Never stop hustling)

Individually, I'm not a big fan of yellow, and grey is just okay. But together, they are gorgeous. I decided to do a Saran Wrap manicure using this color palette. 

What's a Saran Wrap manicure, you ask?  Simply put, you paint a base color on your nail. I started with the grey...

China Glaze in Pellican Grey

After your base coat dries COMPLETELY, paint another color on top of it. 

Sinful Colors in Unicorn

Then, while the second color is sill wet, take a piece of Saran Wrap, crumple it up a bit, and gently roll it across your nail. The Saran Wrap will pick up some of the top color, allowing the base color to peek through and creating a cool marble effect. 

Like so

You'll want to work one nail at a time so the second color doesn't dry before you saran it. 

I added a coat of China Glaze's "Fairy Dust" for some sparkle and topped it off with Zoya's top coat and quick dry drops. The top coat gently blends the colors together so there aren't any harsh lines like in the above photo. 

Ta-da!


Dry cuticles are still a problem. 

I'm pretty happy with the result. If I did it again, I'd use the yellow as the bottom color so that the grey wouldn't give it a greenish tinge. But I'll definitely be doing this design again with other colors. 

The rest of the March is pretty hectic; I was planning on doing St. Patrick's Day nails, a Color of the Month Manicure, and Birthday nails, but I may only get to 2 out of 3. We will see!

Friday, February 14, 2014

Kisses and Candy Mani and Nail Vinyls Review!

Happy Valentine's Day! Normally, I like to write new blog posts on Monday, but by then nobody will care about my themed nails. So I figured I would post a little earlier this week. 


Zoya lovin'


I'm a big 'ol romantic softie. I love V-Day, and to be honest, I don't understand why some people get so butthurt and defensive about it. It's gotten to the point where people who are celebrating valentine's day borderline have to apologize for it. Hey, listen: If you don't want couples to use a commercial Hallmark holiday to showcase their love for each other, why do YOU use it to go out of your way to shit all over the holiday? Although, I am in no way encouraging you to be a cynical grinch all the time. 


The bottom line is, whether you have a significant other or not, Valentine's Day is a great day to take the time in our busy SnapChat, Insta, Need-It-Now life to tell someone you care about that you appreciate them. Have a best friend? Go grab dinner together. Get your mom a bouquet of flowers. Go catch a game with your dad. Take your dog for a walk to get some heart shaped donuts. Volunteer your time at a retirement home. Literally do anything but sit online and be a big love grouch. 


Anyway, like I said, I love Valentine's Day. So I took the time to do a themed manicure using Nail Vinyls. Linda, the inventor of Nail Vinyls, made these ingenious little guys to make nail art a hell of a lot easier for just about anyone. So what are Nail Vinyls? They are sheets of vinyl cut into different shapes (chevrons, half moons, zebra pattern, French tips, etc) that you place on your nail, paint over, and then remove to create the desired effect. This is basically like a way better and easier version of a tape manicure. The vinyls are re-stickable, and leave no residue on the nail, unlike regular tape. Here's how they work:


Step 1: Paint a base color on your nails. Let it dry completely. 

Step 2: Apply Nail Vinyls, making sure that all edges and spaces around your cuticles are sealed (lifted edges = polish bleeding!)

Step 3: Paint over the stencil

Step 4: Carefully remove vinyls while polish is still wet. Clean up. Top coat. You're done!

I did some hand painted candy hearts on my ring finger just for fun. I love the way the whole thing turned out. Also, the heart midi rings I got at Forever 21 are so cute!


This past week I also painted my friend Jess's nails. I thought this fun Scrabble themed mani would also be appropriate to post this week...


I practiced those letters so hard. 

So that's it! I hope that no matter what, you had a lovely Valentine's Day. And make sure to check out that Nail Vinyls link I posted above! At $5 and up a sheet, it's a total steal to get artsy nails the easy way. Her IG is @teismom too, and she always posts new designs and sales! 

Monday, February 10, 2014

Color of the Month: Amythyst

There wasn't a lot going on this past week, besides a rowdy night in AC that I'd rather not go into detail about. So I figured that maybe as a monthly addition to the blog I would do a spotlight on that month's gemstone and do a manicure featuring that color. 

For all you Februay babies, this week's manicure is inspired by amethysts. I did a simple purple gradient/ombre manicure with an ombre chevron accent nail. 


For the chevrons I used @teismom's Nail Vinyls, which have become an almost overnight sensation in the nail art community. I'll be doing a full review of her Nail Vinyls in next week's posting, so definitely look out for that!

I also forgot to take a picture of the polishes I used, but if any of you are truly curious feel free to ask in the comments. 

Pretty reminiscent of my salon wall, right?


I really loved this manicure. Simple, with just the right splash of fun. 

Next week will be much more exciting, with a write up on my Valentine's Day themed nails that I'll be doing later in the week, as well as a feature of a girlfriend's Scrabble nails that I did for her and the Nail Vinyl review. Lots of exciting things! 

Monday, February 3, 2014

Super (Boring) Bowl

I am notoriously not into sports. 

When I was little, maybe 7 years old or so, I probably had more sports enthusiasm than I do now. I'd regularly go to baseball games with my mom. I could name most of the players on the Buffalo Sabres hockey team and would watch the games regularly. I would even sometimes dress sporty because I liked "looking athletic", even though I knew I couldn't even throw a ball to save my life. 

I still root for my Sabres to win a Stanley Cup one day (Fuck you, Dallas!) and I enjoy seeing hockey and baseball games live, but football has never. EVER. Been my thing. 

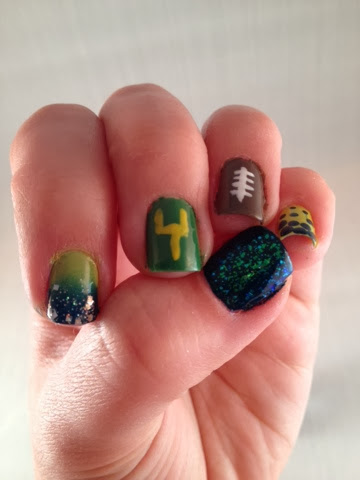
So imagine my surprise when I discovered we were hosting a Super Bowl party, and I actually got into it. I chose a team. I wore Seahawks colored eye makeup, and I did a football themed manicure. 

I picked the Seahawks for two reasons: Firstly, because my college mascot, the Osprey, is a type of Seahawk. The second, because, color scheme. Let's be honest, any girl or guy out there that doesn't know anything about football was rooting for Seattle because their uniforms are pretty clutch. 

Despite the fact the team I picked won, it was easily the most boring Super Bowl I have ever watched. I really only find football exciting when the game is close. So when it gets to the point where everybody on Facebook is praying for a shutout, just to make things interesting, you know it's bad. 

And was it just me, or were the commercials even pretty lame this year? Usually my favorite part of the Super Bowl is the commercials and the food, and this year all I was left with post-game was a 5lb food baby and, ironically, a feeling of emptiness. It wasn't even fun bragging that the team I picked won. Literally nobody cared. 

But at least I got this cute manicure out of it. 

Basic Lineup (ha! See what I did there?): OPI "I Saw...U Saw...We Saw... Warsaw", China Glaze "Pellican Grey", and OPI "Did It On 'Em"

The full team


My favorite nail was my thumbnail. I used Zoya's blue flakie (I forget the name) and Sinful Color's "Green Ocean" over the OPI "I Saw..." Base. I'm thinking of removing the other four nail art colors and doing the rest of my hand like this for the week. Check out those color shifting flakies!


What did you think of the Super Bowl turnout? Were you as bored as I was? At least I was surrounded by delicious food and great company! 


Monday, January 13, 2014

Hand-Painted Dahlia Nails

I couldn't think of a clever post title this week 😖 sorry!

So yesterday my husband's friend Bob invited us over to his house to watch the Flyers game, but I had already been planning on watching the Golden Globes so I didn't want to go... Until Bob offered up his second TV in his man cave :P I spent a peaceful evening tainting his mancave with my femininity by sipping on wine, watching the awards show, and painting my nails. Ha! 

The weather in NJ has been pretty erratic lately. One day we are deep into a "polar vortex" (ie normal winter weather) and the next it's 55 degrees and sunny. I guess I've had spring on the mind lately, with its more consistent beautiful weather, because this week's manicure is very bright and spring-y!

Dahlias are my favorite ever flowers. I love the shape of the petals and the variety of the colors they come in. So I found a fun dahlia-type pattern and (tried to) replicate it. 

Here was the inspiration 
(Via google image)

After attempting this design on my left ring finger, I decided I didn't have the patience to do it again on my right hand. Often, my left hand has more going on design wise for two reasons: it is the hand most often featured in my nail photos, and I am right handed, so I can paint more intricate designs on my left hand. 

Instead of doing this dahlia design on my other ring finger, I did a hand painted brush stroke flower design instead and I love the way it turned out. I even did the design on my thumb nails. I think I actually prefer my right hand this week! What do you guys think? 


And here's some shots of my right hand...


Colors used for this manicure: OPI "My Vampire is Buff", Ulta "Eye-Popping Poppy", Hayley Williams for MAC in "Riot Gear", and Zoya in "Darcy".